Emotion Upin & Ipin Pada Komen Blog

Posted by Borong Shop | Labels: , ,


Pada post yang sebelumnya saya ada menerangkan bagaimana untuk membuat emotion soldier pada komen blog. Dan pada kali ini pula agak berbeza kerana saya menggunakan emotion upin dan ipin pada komen blog. Untuk membuatnya seperti biasa sila ikut step di bawah :

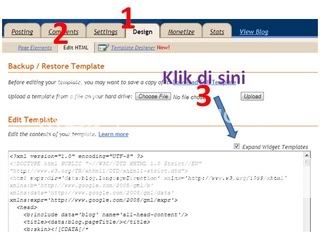
1) Login blogger >> Design >> Edit Html >> Download full Template >> Expand Widget Template 
2) Setelah itu dengan , dengan menggunakan kekunci CTRL + F/ F3 cari kod </body>
3) Jika anda sudah menjumpainya, sila copy kod di bawah ini dan paste kan sebelum/di atas kod </body>

<script src='http://aditx.fileave.com/upin-emoticons.js' type='text/javascript'/>

4) Setelah selesai, cari kod di bawah ini pula :

<b:if cond='data:post.embedCommentForm'>

Jika sudah menemukannya sila copy kod dibawah ini tepat di atas/sebelum kod 
<b:if cond='data:post.embedCommentForm'>

<b><img height='50' src='http://lh3.ggpht.com/_UEOySJCSmVg/TC1_y45CSbI/AAAAAAAAA78/QsXnQdLYu7A/s800/ehsan01.gif' width='50'/>
:a:
<img height='50' src='http://lh4.ggpht.com/_UEOySJCSmVg/TC1_zL6GKxI/AAAAAAAAA8A/hhFDtKzpMJo/s800/ehsan02.gif' width='50'/>
:b:
<img height='50' src='http://lh3.ggpht.com/_UEOySJCSmVg/TC1_zFOpRNI/AAAAAAAAA8E/IgAjo0-WC3k/s800/fizi01.gif' width='50'/>
:c:
<img height='50' src='http://lh6.ggpht.com/_UEOySJCSmVg/TC1_zAkM1fI/AAAAAAAAA8I/WbE7K08g2zU/s800/ipin01.gif' width='50'/>
:d:
<img height='50' src='http://lh5.ggpht.com/_UEOySJCSmVg/TC1_zSnurLI/AAAAAAAAA8M/SE6ijbGGRgY/s800/ipin02.gif' width='50'/>
:e:
<img height='50' src='http://lh4.ggpht.com/_UEOySJCSmVg/TC2ACEPepaI/AAAAAAAAA8Q/Mr3O2IY_PwY/s800/kakros01.gif' width='50'/>
:f:
<img height='50' src='http://lh4.ggpht.com/_UEOySJCSmVg/TC2ACUO5MxI/AAAAAAAAA8U/lOZem_1eYzA/s800/kakros02.gif' width='50'/>
:g:
<img height='50' src='http://lh6.ggpht.com/_UEOySJCSmVg/TC2ACWDn6NI/AAAAAAAAA8Y/BdPtc9HGzbc/s800/mail01.gif' width='50'/>
:h:
<img height='50' src='http://lh6.ggpht.com/_UEOySJCSmVg/TC2ACXXjJ6I/AAAAAAAAA8c/afGmF42wKNk/s800/upin01.gif' width='50'/>
:i:
<img height='50' src='http://lh3.ggpht.com/_UEOySJCSmVg/TC2ACt_jfiI/AAAAAAAAA8g/b0tn4s4TpUU/s800/upin02.gif' width='50'/>
:j:
</b>


Setelah semuanya selesai, klik preview dan jika tiada sebarang error maka klik save template


Cara pasang soldier emotions pada kotak komen

Posted by Borong Shop | Labels: , ,


Memasang emotion pada komen anda sememangnya mencantikkan lagi blog.Akan tetapi, Untuk makluman anda, memasang emotion pada komen blog adalah tidak sesuai untuk semua template. Ada sesetengah template yang hanya mengeluarkan kod tetapi emotion tidak dapat dihasilkan. Jadi kepada sesiapa yang berminat mencuba saya nasihatkan back up dahulu full template anda untuk mengelakkan sebarang error..

Untuk membuatnya sila ikut beberapa langkah ini :

1) Login Blogger >> Design >> Edit Html >> Expand Widget Template
2) Selepas itu dengan menggunakan CTRL + F cari kod </body>
3) Copy kod di bawah ini dan paste sebelum ataupun di atas kod </body>

<script src='http://aditx.fileave.com/soldier-emoticons.js' type='text/javascript'/>

Setelah selesai, cari pula kod di bawah ini :

<b:if cond='data:post.embedCommentForm'>

Jika sudah menemukan kod di atas, copy kod di bawah ini dan paste sebelum/di atas kod  
<b:if cond='data:post.embedCommentForm'>

<b><img height='50' src='http://lh4.ggpht.com/_UEOySJCSmVg/S81H087PQqI/AAAAAAAAA1Q/XJwK7ZX_OWI/s800/th_toel2.gif' width='50'/>
:a:
<img height='50' src='http://lh5.ggpht.com/_UEOySJCSmVg/S81H0-7Ic_I/AAAAAAAAA1M/4elLiuOvxAE/s800/th_sinar_penghancur.gif' width='50'/>
:b:
<img height='50' src='http://lh4.ggpht.com/_UEOySJCSmVg/S81HtryEUoI/AAAAAAAAA1I/P_DjCdY63ss/s800/th_rokok_dulu_bos.gif' width='50'/>
:c:
<img height='50' src='http://lh4.ggpht.com/_UEOySJCSmVg/S81HtSx5JkI/AAAAAAAAA1E/rFy1OtLdpfk/s800/th_nyanyi_dolo.gif' width='50'/>
:d:
<img height='50' src='http://lh3.ggpht.com/_UEOySJCSmVg/S81HtAkZLWI/AAAAAAAAA1A/MtxAiF2noLs/s800/th_ngupil.gif' width='50'/>
:e:
<img height='50' src='http://lh4.ggpht.com/_UEOySJCSmVg/S81HtB260HI/AAAAAAAAA08/s4FrKbVSiqE/s800/th_ngantuk.gif' width='50'/>
:f:
<img height='50' src='http://lh4.ggpht.com/_UEOySJCSmVg/S81HtDrG9GI/AAAAAAAAA04/iD3Qgl_HiMk/s800/th_nangis_bawang.gif' width='50'/>
:g:
<img height='50' src='http://lh5.ggpht.com/_UEOySJCSmVg/S81HjGJfEAI/AAAAAAAAA00/M_2hdkO1jrc/s800/th_mboh_gajelas.gif' width='50'/>
:h:
<img height='50' src='http://lh4.ggpht.com/_UEOySJCSmVg/S81HjLDGxSI/AAAAAAAAA0w/cNyFhVZ0eow/s800/th_hoeekzz.gif' width='50'/>
:i:
<img height='50' src='http://lh5.ggpht.com/_UEOySJCSmVg/S81Hi1DwTFI/AAAAAAAAA0s/PpjN6pC6Yvg/s800/th_cloud_ngeDJ_wkaaka.gif' width='50'/>
:j:
<img height='50' src='http://lh5.ggpht.com/_UEOySJCSmVg/S81HiytkCuI/AAAAAAAAA0o/pyVM3hcKHUI/s800/th_bye.gif' width='50'/>
:k:
<img height='50' src='http://lh3.ggpht.com/_UEOySJCSmVg/S81Hi-RW5AI/AAAAAAAAA0k/TuBPNUsIun0/s800/th_boom_boom.gif' width='50'/>
:l:
</b>


Setelah semuanya selesai sila klik preview dan jika tiada sebarang error maka klik save template


Tambah Icon Di sebelah Tajuk Post

Posted by Borong Shop | Labels: , ,


Penambahan ikon disebelah tajuk posting adalah merupakan satu daya penarik ,selain dari tajuk posting itu sendiri.Bagi tujuan itu gambar yang dimasukkan seperti pada blog ini adalah bersaiz 32x32 dan ia boleh didownload disini


Untuk membuatnya ikuti langkah ini:

sila login blog dan masuk ke Design--->> Edit Html

Kemudian cari kod berikut ini:

.post h3 {
margin:.5em 0;
padding:30px 0px 0px 45px;
font-size:120%;
font-style:italic;
line-height:1.3em;
color:#333;
background:url(url gambar ) no-repeat left center;}


kod berwarna kuning ini adalah kod yang perlu ditambah di bawah kod tersebut

Jika tidak jumpa kod seperti diatas cuba pula kod ini :

<a expr:href='data:post.url'><data:post.title/></a>

Nota: jika terdapat lebih dari satu kod di atas ini(maksudnya anda jumpa kod yg sama) ,maka masukkan pada kod yang pertama.
Letakkan kod(yang berwwarna kuning) kepada kod url gambar anda yang sudah di upload tadi..

<a expr:href='data:post.url'><img src="gantikan kepada url gambar anda"/> <data:post.title/></a>

Setelah selesai klik preview,jika tiada error maka seterusnya klik save template


Membuat Drop Down Menu

Posted by Borong Shop | Labels: , ,


Membuat menu horizontal sebenarnya ada banyak alternatif, untuk kali ini kita akan mencuba membuat jenis menu horizontal type professional dropdown, sebagaimana namanya tentunya ini akan membuat blog/site kita menjadi lebih lebih professional


Langkah Pertama
Login ke akaun Blogger
Pergi ke DESIGN => EDIT HTML => EXPAND TEMPLATE WIDGET.
Selepas itu dengan menggunakan ctrl+f atau f3, cari kod ]]></b:skin>


copy kod di bawah ini dan paste kn sebelum atau di atas kod ]]></b:skin>


.preload1 {background: url(http://1.bp.blogspot.com/_-RTzkzFP6c0/TP1QEGqTydI/AAAAAAAAACE/6ZympCECo3M/s1600/bagus.gif);}
.preload2 {background: url(http://1.bp.blogspot.com/_-RTzkzFP6c0/TP1QEGqTydI/AAAAAAAAACE/6ZympCECo3M/s1600/bagus.gif);}

#nav {padding:0; margin:0; list-style:none; height:38px; background:transparent url(http://1.bp.blogspot.com/_-RTzkzFP6c0/TP1QEGqTydI/AAAAAAAAACE/6ZympCECo3M/s1600/bagus.gif) repeat-x; position:relative; z-index:500; font-family:arial, verdana, sans-serif;}
#nav li.top {display:block; float:left;}
#nav li a.top_link {display:block; float:left; height:35px; line-height:33px; color:#FFD700; text-decoration:none; font-size:11px; font-weight:bold; padding:0 0 0 12px; cursor:pointer;background: url(http://1.bp.blogspot.com/_-RTzkzFP6c0/TP1QEGqTydI/AAAAAAAAACE/6ZympCECo3M/s1600/bagus.gif);}
#nav li a.top_link span {float:left; display:block; padding:0 24px 0 12px; height:35px; background: url(http://i864.photobucket.com/albums/ab206/kibagus/menu%20animasi/three_0.gif) right top no-repeat;}
#nav li a.top_link span.down {float:left; display:block; padding:0 24px 0 12px;height:35pxpx; background: url(http://1.bp.blogspot.com/_-RTzkzFP6c0/TP1QEGqTydI/AAAAAAAAACE/6ZympCECo3M/s1600/bagus.gif) no-repeat right top;}

#nav li:hover a.top_link {color:#fff; background: url(http://1.bp.blogspot.com/_-RTzkzFP6c0/TP1QEGqTydI/AAAAAAAAACE/6ZympCECo3M/s1600/bagus.gif) no-repeat;}
#nav li:hover a.top_link span {background:url(http://1.bp.blogspot.com/_-RTzkzFP6c0/TP1QEGqTydI/AAAAAAAAACE/6ZympCECo3M/s1600/bagus.gif) no-repeat right top;}
#nav li:hover a.top_link span.down {background:url(http://1.bp.blogspot.com/_-RTzkzFP6c0/TP1QEGqTydI/AAAAAAAAACE/6ZympCECo3M/s1600/bagus.gif) no-repeat right top; padding-bottom:3px;}

/* Default list styling */

#nav li:hover {position:relative; z-index:200;}

#nav li:hover ul.sub
{left:1px; top:38px; background: #50b5d0; padding:3px; border:1px solid #0b4d97; white-space:nowrap; width:90px; height:auto; z-index:300;}
#nav li:hover ul.sub li
{display:block; height:20px; position:relative; float:left; width:90px; font-weight:normal;}
#nav li:hover ul.sub li a
{display:block; font-size:11px; height:18px; width:88px; line-height:18px; text-indent:5px; color:#000; text-decoration:none;border:1px solid #50b5d0;}
#nav li ul.sub li a.fly
{background:#50b5d0 url(http://1.bp.blogspot.com/_-RTzkzFP6c0/TP1QEGqTydI/AAAAAAAAACE/6ZympCECo3M/s1600/bagus.gif) 80px 6px no-repeat;}
#nav li:hover ul.sub li a:hover
{background:#3f96a9; color:#fff; border-color:#fff;}
#nav li:hover ul.sub li a.fly:hover
{background:#3f96a9 url(http://1.bp.blogspot.com/_-RTzkzFP6c0/TP1QEGqTydI/AAAAAAAAACE/6ZympCECo3M/s1600/bagus.gif) 80px 6px no-repeat; color:#fff;}

#nav li b {display:block; font-size:11px; height:18px; width:88px; line-height:18px; margin-bottom:3px; text-indent:6px; color:#ff6; border-bottom:1px solid #ff6; cursor:default;}

#nav li:hover li:hover ul,
#nav li:hover li:hover li:hover ul,
#nav li:hover li:hover li:hover li:hover ul,
#nav li:hover li:hover li:hover li:hover li:hover ul
{left:90px; top:-4px; background: #50b5d0; padding:3px; border:1px solid #0b4d97; white-space:nowrap; width:90px; z-index:400; height:auto;}

#nav ul,
#nav li:hover ul ul,
#nav li:hover li:hover ul ul,
#nav li:hover li:hover li:hover ul ul,
#nav li:hover li:hover li:hover li:hover ul ul
{position:absolute; left:-9999px; top:-9999px; width:0; height:0; margin:0; padding:0; list-style:none;}

#nav li:hover li:hover a.fly,
#nav li:hover li:hover li:hover a.fly,
#nav li:hover li:hover li:hover li:hover a.fly,
#nav li:hover li:hover li:hover li:hover li:hover a.fly
{background:#3f96a9 url(http://1.bp.blogspot.com/_-RTzkzFP6c0/TP1QEGqTydI/AAAAAAAAACE/6ZympCECo3M/s1600/bagus.gif) 80px 6px no-repeat; color:#fff; border-color:#fff;}

#nav li:hover li:hover li a.fly,
#nav li:hover li:hover li:hover li a.fly,
#nav li:hover li:hover li:hover li:hover li a.fly
{background:#50b5d0 url(http://1.bp.blogspot.com/_-RTzkzFP6c0/TP1QEGqTydI/AAAAAAAAACE/6ZympCECo3M/s1600/bagus.gif) 80px 6px no-repeat; color:#000; border-color:#50b5d0;}


jika telah siap,klik preview dahulu..jika tiada apa2 error maka klik save template dan teruskan dengan step di bawah pula


Langkah kedua
1)Klik Page design
2)Klik Add  a Gadget dan masukkan kod di bawah


<span class="preload1"></span>
<span class="preload2"></span>

<ul id="nav">
<li class="top"><a href="#" class="top_link"><span>Home</span></a></li>
<li class="top"><a href="#" id="Menu" class="top_link"><span class="down">Menu</span></a>
<ul class="sub">

<li><b>Judul1</b></li>
<li><a href="#" class="fly">Subjudul1</a>
<ul>
<li><a href="#" target="_blank">subitem1.1</a></li>
<li><a href="#" target="_blank">subitem2.1</a></li>
<li><a href="#" target="_blank">subitem3.1</a></li>
</ul>
</li>
<li><a href="#" class="fly">Subjudul2</a>
<ul>
<li><a href="#" target="_blank">subitem1.2</a></li>
<li><a href="#" target="_blank">subitem2.2</a></li>
<li><a href="#" target="_blank">subitem3.2</a></li>
</ul>
</li>
<li><a href="#" class="fly">Subjudul3</a>
<ul>
<li><a href="#" target="_blank">subitem1.3</a></li>
<li><a href="#" target="_blank">subitem2.3</a></li>
<li><a href="#" target="_blank">subitem3.3</a></li>

<li><b>Subjudul3.1</b></li>
<li><a href="#">item1.3.1</a></li>
<li><a href="#">item2.3.1</a></li>
<li><a href="#">item3.3.1</a></li>

<li><b>Subjudul3.2</b></li>
<li><a href="#">item1.3.2</a></li>
<li><a href="#">item2.3.2</a></li>
<li><a href="#">item3.3.2</a></li>
</ul>
</li>


<li><b>Judul2</b></li>
<li><a href="#" target="_blank">subitem1.2</a></li>
<li><a href="#" target="_blank">subitem2.2</a></li>
<li><a href="#" target="_blank">subitem3.2</a></li>
</ul>


</li>
<li class="top"><a href="#" id="services" class="top_link"><span class="down">menu2</span></a>
<ul class="sub">
<li><a href="#" target="_blank">submenu1.2</a></li>
<li><a href="#" target="_blank">submenu2.2</a></li>
<li><a href="#" target="_blank">submenu3.2</a></li>
</ul>
</li>

</li>
<li class="top"><a href="#" id="services" class="top_link"><span class="down">menu3</span></a>
<ul class="sub">
<li><a href="#" target="_blank">submenu1.3</a></li>
<li><a href="#" target="_blank">submenu2.3</a></li>
<li><a href="#" target="_blank">submenu3.3</a></li>
</ul>
</li>

</li>
<li class="top"><a href="#" id="services" class="top_link"><span class="down">menu4</span></a>
<ul class="sub">
<li><a href="#" target="_blank">submenu1.4</a></li>
<li><a href="#" target="_blank">submenu2.4</a></li>
<li><a href="#" target="_blank">submenu3.4</a></li>
</ul>
</li>

<li class="top"><a href="#" id="profil" class="top_link"><span>menu5</span></a></li></li></li></ul>


Keterangan :
Warna Merah, Alamat URL yang akan menjadi drop menu(isikan dengan web yg anda inginkan)
Warna Hijau, tajuk besar bagi menu hadapan(anda cuba ubah dan lihat hasilnya)

Selamat Mencuba...


Cara Memasang Yahoo Emotion Di Atas Kotak Komen

Posted by Borong Shop | Labels: , ,


Memasang emoticon smiley ini rasanya dah banyak diposting oleh blog blog lain.Namun saya masukkan pada entri kali ini bagi kemudahan rakan rakan yang blogger yang ingin memasukkan nya pada komen di blog.

Berikut adalah caranya:

1. Masuk ke Blogger -->> Design -->> Edit HTML

2. kemudian tandakan pada "Expand Widget Template"
3. Sekarang kembali ke template, cari kod ini :

</body>

4.Gunakan kemudahan search Ctrl +F untuk membuat pencarian

5. salin kod dibawah dan letakkan diatas kod </body>


<script src='http://oom.blog.googlepages.com/smiley.js' type='text/javascript'/>

6. setelah selesai seterusnya cari kod ini pula :

<b:if cond='data:post.embedCommentForm'>

7. Pastekan kod dibawah ini dibawah kod diatas(no. 6)


<div style='-moz-background-clip: -moz-initial; -moz-background-origin: -moz-initial; -moz-background-inline-policy: -moz-initial; width: 369; text-align: left; border: 1px solid #cccccc; padding: 5px; background: #eeeddf; height:86'>
<b>

<img border='0' height='18' src='http://us.i1.yimg.com/us.yimg.com/i/mesg/emoticons7/21.gif' width='18'/> :))

<img border='0' height='18' src='http://us.i1.yimg.com/us.yimg.com/i/mesg/emoticons7/71.gif' width='18'/> ;))

<img border='0' height='18' src='http://us.i1.yimg.com/us.yimg.com/i/mesg/emoticons7/5.gif' width='18'/> ;;)

<img border='0' height='18' src='http://us.i1.yimg.com/us.yimg.com/i/mesg/emoticons7/4.gif' width='18'/> :D

<img border='0' height='18' src='http://us.i1.yimg.com/us.yimg.com/i/mesg/emoticons7/3.gif' width='18'/> ;)

<img border='0' height='18' src='http://us.i1.yimg.com/us.yimg.com/i/mesg/emoticons7/10.gif' width='18'/> :p

<img border='0' height='18' src='http://us.i1.yimg.com/us.yimg.com/i/mesg/emoticons7/20.gif' width='22'/> :((

<img border='0' height='18' src='http://us.i1.yimg.com/us.yimg.com/i/mesg/emoticons7/1.gif' width='18'/> :)

<img border='0' height='18' src='http://us.i1.yimg.com/us.yimg.com/i/mesg/emoticons7/2.gif' width='18'/> :(

<img border='0' height='18' src='http://us.i1.yimg.com/us.yimg.com/i/mesg/emoticons7/8.gif' width='18'/> :X

<img border='0' height='18' src='http://us.i1.yimg.com/us.yimg.com/i/mesg/emoticons7/12.gif' width='18'/> =((

<img border='0' height='18' src='http://us.i1.yimg.com/us.yimg.com/i/mesg/emoticons7/13.gif' width='18'/> :-o

<img border='0' height='18' src='http://us.i1.yimg.com/us.yimg.com/i/mesg/emoticons7/7.gif' width='20'/> :-/

<img border='0' height='18' src='http://us.i1.yimg.com/us.yimg.com/i/mesg/emoticons7/11.gif' width='18'/> :-*

<img border='0' height='18' src='http://us.i1.yimg.com/us.yimg.com/i/mesg/emoticons7/22.gif' width='18'/> :|

<img border='0' height='18' src='http://us.i1.yimg.com/us.yimg.com/i/mesg/emoticons7/35.gif' width='24'/> 8-}

<img border='0' height='18' src='http://us.i1.yimg.com/us.yimg.com/i/mesg/emoticons7/100.gif' width='31'/> :)]

<img border='0' height='18' src='http://us.i1.yimg.com/us.yimg.com/i/mesg/emoticons7/102.gif' width='44'/> ~x(

<img border='0' height='18' src='http://us.i1.yimg.com/us.yimg.com/i/mesg/emoticons7/104.gif' width='30'/> :-t

<img border='0' height='18' src='http://us.i1.yimg.com/us.yimg.com/i/mesg/emoticons7/66.gif' width='18'/> b-(

<img border='0' height='18' src='http://us.i1.yimg.com/us.yimg.com/i/mesg/emoticons7/62.gif' width='18'/> :-L

<img border='0' height='18' src='http://us.i1.yimg.com/us.yimg.com/i/mesg/emoticons7/14.gif' width='34'/> x(

<img border='0' height='18' src='http://us.i1.yimg.com/us.yimg.com/i/mesg/emoticons7/24.gif' width='30'/> =))

</b>


</div>


8)Preview dulu hasilnya,jika tiada sebarang error,klik butang dan save template

P/S : Tidak semua template sesuai untuk cara ini. Pastikan anda sentiasa back up template sebelum melakukan sebarang perubahan


Cara Buat Border Melengkung

Posted by Borong Shop | Labels: , ,


Menukar tampilan bagi mengindahkan blog tentunya merupakan antara yang tidak dapat tidak dilakukan oleh seseorang blogger.Selain dari cantik dan tidak memberatkan loading blog adalah antara yang perlu diberi perhatian bila melakukan sesuatu perubahan pada template.Sebelum ini saya ada membuat entri tentang membuat border disekeliling posting.tapi dalam bentuk persegi.Kali ini pula dipenjuru border adalah dalam bentuk bulat.


Untuk membuatnya:

1.Masukk ke blogger dan pilih design
2.Klik edit HTML dan tandakan pada Expand template widget
3.Cari kod h2.date header{ 

dan letakkan kod ini dibawahnya


border-left:3px solid #0000FF; 
border-right:3px solid #0000FF; 
border-top:3px solid #0000FF; 
border-bottom:0px solid #0000FF; 
-moz-border-radius-topleft:15px;
-moz-border-radius-topright:15px;

pada template blog ini saya letakkan pada kod: post },jadi tarikhnya terletak berasingan

4.cari kod . post-body { 

dan letakkan kod ini dibawahnya

border-right:3px solid #0000FF; 
border-left:3px solid #0000FF;

5. Kemudian cari kod ini pula, .post-footer {
Tambah kod ini dibawahnya

border-left:3px solid #0000FF; 
border-right:3px solid #0000FF; 
border-top:0px solid #0000FF; 
border-bottom:3px solid #0000FF; 
-moz-border-radius-bottomleft:15px;
-moz-border-radius-bottomright:15px;


6.Untuk mengganti border pada sidebar pula cari kod ini:

.sidebar .widget { 

dan letakkan kod ini dibawahnya

border:1px solid #0000FF; 
-moz-border-radius-topleft:15px;
-moz-border-radius-topright:15px;
-moz-border-radius-bottomleft:15px;
-moz-border-radius-bottomright:15px

Kod berwarna kuning adalah kod untuk warna biru,boleh ditukarkan dengan kod warna yang bersesuaian dengan template anda.

7.klik dahulu preview,jika tiada error maka seterusnya save template .